MYOUGA TO JYAKO NO CHA-HANFried-rice with Myouga (Japanese ginger) and Jyako (small dried-sardines)When I feel tired of cooking, this dish comes out repeatedly. I think it isn't greasy like other kinds of fried-rice. It has a savory aroma from Myouga and it also includes nutritious Jyako. Let's enjoy the healthy non-greasy taste. |

|
| Photos: Nov 04 1996 , Made on: Nov 04 1996 , Translated: May 10 1998 | |
|
Reference books: none | |
| It has became one of our standard dishes since I'd tried cooking it once with a reference book about 4-5 years ago. My children love Myouga (Japanese ginger) and Shiso (beef stake plant). I've heard many people say many times "Generally children don't like strong flavored vegetables.", but is it true? Negi fried-rice (fried-rice with Japanese green onion) is also tasty, but I prefer this Myouga & Jyako fried-rice, oriental savory aroma and enriched Jyako-seasoning. Please add plenty of Jyako. The main point to cook a delicious one depends on Time after all. The faster, the better. So it's better to place all ingredients, salt, pepper, soy-sauce and etc., by your cooking stove before you start cooking. Do not forget that the most important point for making delicious fried-rice is only time. So you should place a plate for serving by the cooking stove. |
|
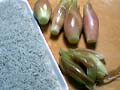
Ingredients Our family ** Me and 2 sons (5 serving for a normal family)
Let's use plenty of Jyako. This time I added 1 pack of Jyako, but I usually use a heaping 1 Masu (1-Go measure cup ). The knock of cooking delicious one is to use frozen cooked-rice. Generally, it's better to cook 1/2 of the fried-rice at a time but, it's bothersome. I always cook it all at once. A wok is better for cooking than a pan, I think. |
| Cooking time (min.) | Pictures | Comments | |||||
|---|---|---|---|---|---|---|---|
| a few minutes |
| ||||||
|
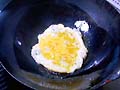
Heat the wok at first, it's very important. Cut Myouga into fine strips like the picture. Beat eggs well. | ||||||
| about 1 minute |
| ||||||
|
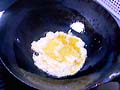
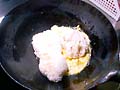
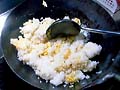
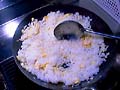
Well, add salad oil and sesame oil to the wok and grease well. Add beaten eggs to the wok and it becomes like the picture's. I've heard it's explained "The eggs are in bloom". Scramble them immediately and rapidly using Saibashi (Japanese cooking chopsticks) until their cooked 70%-80% like the picture and then add rice which is rewarmed by microwave. Mix them well, lightly. | Certain reference books suggest to replace the cooked egg in a plate or something once, and then add more oil and to keep cooking. But if you follow that, rice will become greasy. At first, let egg absorb plenty of oil, and then add ingredients and keep frying. So extra oil comes out properly while cooking. Add rice before eggs completely cooked, that's also the important point. If eggs had been over cooked, they would stick together and become stiff. | |||||
| 3 - 5 |
| ||||||
|
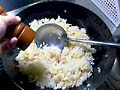
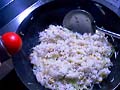
After mixing it lightly until well blended smoothly onto the surface of the wok to cook rice well. Because generally cooking stoves don't have a powerful flame, but we must use them, anyway.
I really want a burner with 20,000 Kcal like professional use.
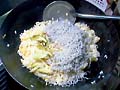
After all ingredients are well cooked, add salt, pepper, sliced Myouga and Jyako all at once. Then it's better to shake the wok to mix the ingredients. I'm sorry that I couldn't show you the photos of me shaking the wok. | Finally, add soy-sauce around the edge of the wok. Adding soy-sauce this way makes soy-sauce flavor strong and savory. So do not add soy-sauce on the ingredients directly. The taste will be completely different. | |||||
Contents copyright 1996-1998 Mitsuo Sugawara
Translater: PB